
SMS and Caller ID forwarder to Telegram
This page is about how to build an SMS and caller ID forwarder to Telegram with Raspberry PI Zero W and Waveshare SIM7600G-H hat that is power supplied and backed-up with a PiSugar 3.
The idea came from blog mete and up-to-date components have been used to build one DIY.
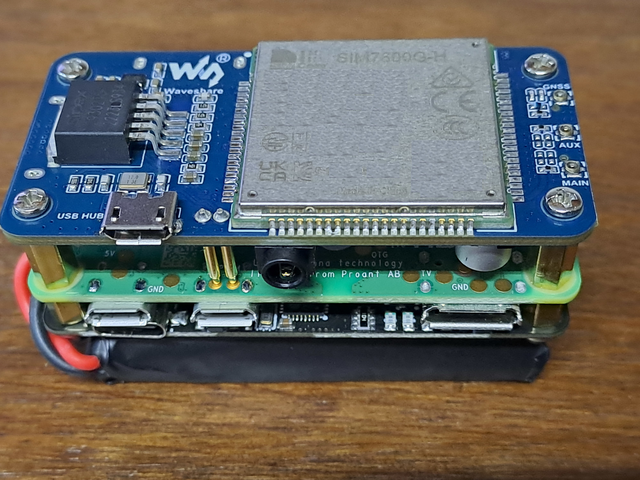
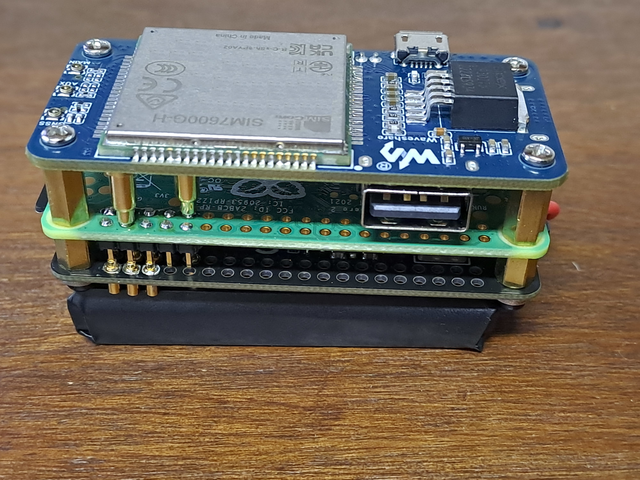
The gadget receives SMS messages and phone calls using a Waveshare SIM7600G-H 4G module and forward them to your Telegram account using Raspberry PI Zero W. A PiSugar 3 UPS module supplies and providing battery backup power. The SIM7600G-H incorporates a 4G module, compatible with 2G/3G/4G network and global support. In addition GPS, BeiDou, Glonass, and LBS base station positioning support is included in this module. PiSugar 3 has full UPS functions and keeps running/working when external power is connecting or disconnecting to avoid data loss. An addition features besides power management is the RTC for time keeping.
The Raspberry Pi Zero W is running DietPi operating system based on Debian. The Gammu SMS service is handling communication with the SIM7600G-H module, listing to incoming SMS and phone calls and it will trigger Python scripts when an SMS messages or calls are received. Python will be also used to read SMS messages and caller identification and forward them via Telegram Bot API.
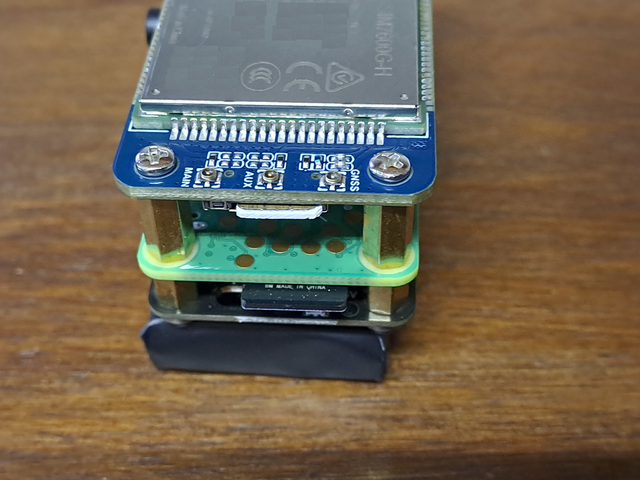
Module stacking and modification #
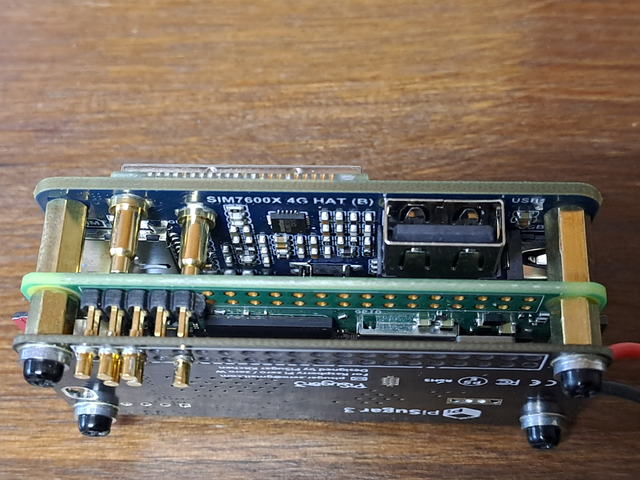
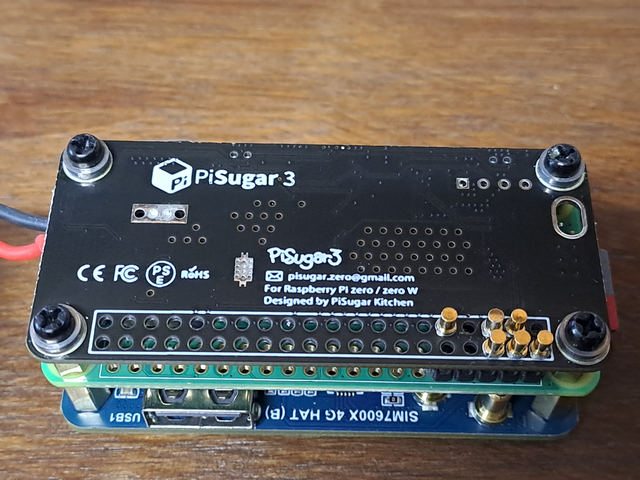
All three hardware modules can be stacked together forming a one block device. However, the PiSugar 3 in its original configuration is supposed to be attached to the lower side of the Raspberry Pi Zero W. On the current build this place is occupied be the SIM7600G-H module due to its pogo pin connection for USB and power supply from the Pi Zero W. As a consequence the pogo pins on the PiSugar 3 must be unsoldered and moved/soldered to the opposite of the PiSugar 3 printed circuit board. In addition a pin header is connecting the pogo pins to the Pi Zero W.

Operating system and software setup #
Dietpi #
Download and install Dietpi following the instructions.
!!! Prior first boot open and modify dietpi-wifi.txt in the boot partition of you SD card. Add credentials for at least one Wifi networks so the Raspberry Pi Zero W will connect instantly during boot process !!!
#---------------------------------------------------------------
# Entry 0
# - WiFi SSID: required, case sensitive
aWIFI_SSID[0]='[your networks SSID]'
# - WiFi key: If no key/open, leave this blank
# - In case of WPA-PSK, alternatively enter the 64-digit hexadecimal key returned by wpa_passphrase
# - Please replace single quote characters ' in your key with '\''. No other escaping is required.
aWIFI_KEY[0]='[your password]'
# - Key type: NONE (no key/open) | WPA-PSK | WEP | WPA-EAP (then use settings below)
aWIFI_KEYMGR[0]='WPA-PSK'
# - WPA-EAP options: Only fill if WPA-EAP is set above
aWIFI_PROTO[0]=''
aWIFI_PAIRWISE[0]=''
aWIFI_AUTH_ALG[0]=''
aWIFI_EAP[0]=''
aWIFI_IDENTITY[0]=''
aWIFI_PASSWORD[0]=''
aWIFI_PHASE1[0]=''
aWIFI_PHASE2[0]=''
# - Path to the certificate file, e.g.: /boot/mycert.cer
aWIFI_CERT[0]=''
Next open config.txt in same folder and add the following:
dtoverlay=i2c-rtc,ds3231
dtparam=i2c_arm=on
Keep enable_uart=0 as it is not required for the SIM7600G-H module.
You may also edit dietpi.txt and configure settings that will be applied during first boot. e.g. Keyboard layout, language and reginal settings, time zone etc. Pay attention also the Network Options!
Insert the SD card into the Raspberry Pi Zero W and boot the device. If WiFi settings are configured correct the device shall be visible in your local network. First time open a SSH connection as user root with ssh root@[your device IP]. Default login password is dietpi. Follow the installation process.
Run dietpi-configas root or sudo. Choose menu option 4 Advanced Options and check:
I2C state        : [On]                                                              │
I2C frequency    : [100 kHz]
Set to I2C state to On in case it's off. Use dietpi-configto apply other settings as desired.
Run dietpi-software, select Browse Software, scroll down and mark [*] 130 Python 3: Runtime system, pip package installer and development headers. Select other software as desired. Confirm and select Install to start the installation process. Follow the onscreen instructions.
PiSugar 3 Power Manager #
Install i2c-tools with apt-get install i2c-tools and use the following commands to see whether it works properly:
~$ sudo i2cdetect -y 1
     0  1  2  3  4  5  6  7  8  9  a  b  c  d  e  f
00:                         -- -- -- -- -- -- -- --
10: -- -- -- -- -- -- -- -- -- -- -- -- -- -- -- --
20: -- -- -- -- -- -- -- -- -- -- -- -- -- -- -- --
30: -- -- -- -- -- -- -- -- -- -- -- -- -- -- -- --
40: -- -- -- -- -- -- -- -- -- -- -- -- -- -- -- --
50: -- -- -- -- -- -- -- 57 -- -- -- -- -- -- -- --
60: -- -- -- -- -- -- -- -- UU -- -- -- -- -- -- --
70: -- -- -- -- -- -- -- --
As a result, the UU mark can be seen at 0x68, indicating that it has been occupied by the system, representing the PiSugar DS3132 RTC.
Address 0x57 is the PiSugar 3 I2C register. See I2C data sheet for details.
Next run the following script:
wget https://cdn.pisugar.com/release/pisugar-power-manager.sh
bash pisugar-power-manager.sh -c release
While running the script some errors appear that raspi-config is not found. That's correct because it is replaced by dietpi-config in DietPi but has no influence on installation.
After finished, you can manage the battery by visiting http://<your raspberry ip>:8421 in your browser. For more information visit PiSugar on Github
The pisugar-server can be configured in /etc/pisugar/config.json in addition to the browser manager.
Gammu SMS Service #
Install Gammu SMS service with sudo apt-get install gammu-smsd.
Open and check sudo nano /etc/default/gammu-smsd configuration. No changes required.
# Defaults for gammu-smsd initscript
# sourced by /etc/init.d/gammu-smsd
# installed at /etc/default/gammu-smsd by the maintainer scripts

#
# This is a POSIX shell fragment
#

# Additional options that are passed to the Daemon.
DAEMON_OPTS=""

# user to use (gammu is default)
#USER=gammu
Open and edit sudo nano /etc/gammu-smsdrc configuration and modify port, connection, HangupCalls, RunOnReceive and RunOnIncommingCalls. Optional checksignal and checknetwork.
# Configuration file for Gammu SMS Daemon
# https://docs.gammu.org/smsd/config.html

# Gammu library configuration, see gammurc(5)
[gammu]
# Please configure this!
port = /dev/ttyUSB2
connection = at115200
# Debugging
#logformat = textall

# SMSD configuration, see gammu-smsdrc(5)
[smsd]
service = files
logfile = syslog
# Increase for debugging information
debuglevel = 0
HangupCalls = 1
RunOnReceive = /home/dietpi/sms2telegram.py
RunOnIncomingCall = /home/dietpi/call2telegram.py

# Device loop services
checkbattery = 0
checksignal = 1
checknetwork = 1

# Disable sending of messages
send = false

# Paths where messages are stored
inboxpath = /var/spool/gammu/inbox/
outboxpath = /var/spool/gammu/outbox/
sentsmspath = /var/spool/gammu/sent/
errorsmspath = /var/spool/gammu/error/
/dev/ttyUSB2 is the default SIM7600G-H control port.
Open and edit the /lib/systemd/system/gammu-smsd.service and add the restart, nice and standard output&error configuration.
[Unit]
Description=SMS daemon for Gammu
Documentation=man:gammu-smsd(1)
After=mysql.service postgresql.service network-online.target

[Service]
EnvironmentFile=-/etc/default/gammu-smsd
# Run daemon as root user
ExecStart=/usr/bin/gammu-smsd --pid=/run/gammu-smsd.pid --daemon
# Run daemon as non-root user (set user/group in /etc/default/gammu-smsd)
#ExecStart=/usr/bin/gammu-smsd --user= --group= --pid=/run/gammu-smsd.pid --daemon
ExecReload=/bin/kill -HUP $MAINPID
ExecStopPost=/bin/rm -f /run/gammu-smsd.pid
Type=forking
PIDFile=/run/gammu-smsd.pid
Restart=always
RestartSec=30
Nice=0
StandardOutput=journal
StandardError=journal

[Install]
WantedBy=multi-user.target
Execute the following command reloading the service file sudo systemctl daemon-reload.
Next restart the Gammu service with sudo service gammu-smsd restart.
You can ceck the Gammu service status and log output:
$ sudo service gammu-smsd status
gammu-smsd.service - SMS daemon for Gammu
Loaded: loaded (/lib/systemd/system/gammu-smsd.service; enabled; preset: enabled)
Active: active (running) since Sat 2024-04-27 19:27:34 CEST; 1h 18min ago
Docs: man:gammu-smsd(1)
Process: 270 ExecStart=/usr/bin/gammu-smsd --pid=/run/gammu-smsd.pid --daemon (code=exited, status=0/SUCCESS)
Main PID: 302 (gammu-smsd)
Tasks: 1 (limit: 478)
CPU: 16.683s
CGroup: /system.slice/gammu-smsd.service
└─302 /usr/bin/gammu-smsd --pid=/run/gammu-smsd.pid --daemon
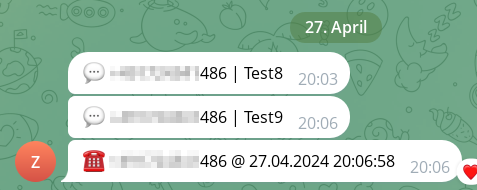
Apr 27 20:06:27 smsgateway gammu-smsd[1281]: Starting run on receive: /home/dietpi/sms2telegram.py IN20240427_200621_00_+xxxxxxxxxxxxx_00.txt
Apr 27 20:06:32 smsgateway gammu-smsd[302]: Process finished successfully
Apr 27 20:06:32 smsgateway gammu-smsd[302]: Subprocess output: Number +xxxxxxxxxxxx have sent text: Test9
Apr 27 20:06:56 smsgateway gammu-smsd[302]: Incoming call! # avail? 1 +xxxxxxxxxxxx
Apr 27 20:06:56 smsgateway gammu-smsd[302]: Incoming call! # hanging up @xxxxxxxxxx 0.
Apr 27 20:06:56 smsgateway gammu-smsd[302]: Incoming call! # avail? 1 +xxxxxxxxxxxx
Apr 27 20:06:56 smsgateway gammu-smsd[302]: Call ended(6).
Apr 27 20:06:56 smsgateway gammu-smsd[1286]: Starting run on incoming call: /home/dietpi/call2telegram.py +xxxxxxxxxxxxx
Apr 27 20:07:00 smsgateway gammu-smsd[302]: Process finished successfully
Apr 27 20:07:00 smsgateway gammu-smsd[302]: Subprocess output: ☎ +xxxxxxxxxxxxx @ 27.04.2024 20:06:58
How to create a Telegram bot #
Now you need to create a bot in Telegram and obtain a token. You can create the bot by following these instructions. Afterwards, start a chat with that bot in your Telegram account and send a test message to your bot. This will help to identify your chat ID.
Get Telegram chat ID #
Open following URL with you Telegram Bot token and copy the chat ID in the response https://api.telegram.org/bot[YOUR-BOT-TOKEN]/getUpdates.
The chat ID is the numerical id in the message response {"id":1234567890,"first_name":"Hello","last_name":"World","username":"helloworld","type":"private"}, 1234567890 in this example. Both, bot token and chat ID, are required in the following scripts for communication with your Telegram bot.
Telegram forwarding scripts #
Install Telegram Bot API python library sudo pip3 install python-telegram-bot.
Create the SMS forwarding script sms2telegram.py:
Create the caller identification script call2telegram.py:
Make both Python3 files executable.
$ chmod +x /home/pi/sms2telegram.py
$ chmod +x /home/pi/call2telegram.py
Make sure the script path and files name are equal to what has been set in gammu service configuration.
See pysugar.py for details about what information can be retrieved from PiSugar 3 in Python. And documentation for python-gammu.
Result #
SMS and caller identification forwarded to Telegram.
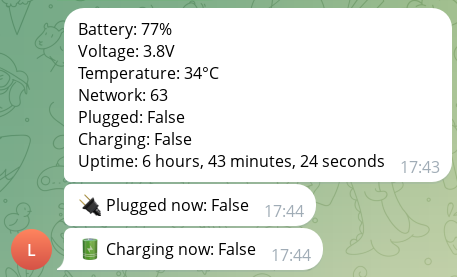
Optional device monitoring #
An optional Python script can be used for monitoring the forwarder device.
Install dependencies:
apt-get install libgammu-dev
pip3 install python-gammu
pip3 install 'python-telegram-bot[job-queue]'
Create device monitoring script status2telegram.py:
And make it executable $ chmod +x /home/pi/status2telegram.py
Add to cron so script will be executed on boot. Run crontab -e and add the line @reboot /home/dietpi/status2telegram.py.
👈 Home